Webhook
Webhook is how IDCloud automatically tells your system when something happens in an identity verification journey. Instead of your system asking "is it done yet?", IDCloud calls your API the moment the event occurs.
On this screen you set your API's address, how IDCloud authenticates against it, and what happens when it doesn't respond.
Who it's for: customers who want to receive journey results automatically, without polling. Applies to all integration types.
What changes in your system: it now receives a notification on every state change, instead of needing to poll IDCloud.
Where to find it: IDCloud Portal → sidebar Settings → Webhook tab.
Before you start
Access permission
Your user needs the Configurator profile — the same one that grants access to Journey Customization. If the Webhook tab doesn't show up, talk to your account administrator.
How the configuration is applied
| Scope | One webhook per tenant and branch. There's no list: if one is already configured, it gets edited, not duplicated. |
| Separate environments | The Staging Portal configures the UAT webhook; the Production one configures Production. Configuring one doesn't affect the other. |
| When it takes effect | As soon as you save. |
| Secret security | The secret is encrypted and never shown again in plain text. On screen it's always masked. |
What to have ready
- The HTTPS URL of your API that will receive the notifications. It needs to be live and accepting requests before you save.
- The credentials your API expects, based on the authentication method you choose (see Step 3).
- If your API has a capacity limit, the number of requests per second it supports.
What to decide beforehand
Two technical decisions depend on whoever maintains your API, not on whoever operates the Portal. Worth aligning before opening the screen:
- Which authentication method your API requires.
- Whether you'll adjust the retries or leave them at the default. The default works for most cases.
Step by step
Step 1 — Open the Webhook tab
In the IDCloud Portal, click the gear icon (Settings) in the sidebar and select the Webhook tab.
If you don't have a webhook configured yet, the screen shows "No webhooks created" and a Create webhook button. If you already have one, the screen shows the Your webhook card with the endpoint, authentication type, and masked secret, plus a Configure webhook button to edit it.
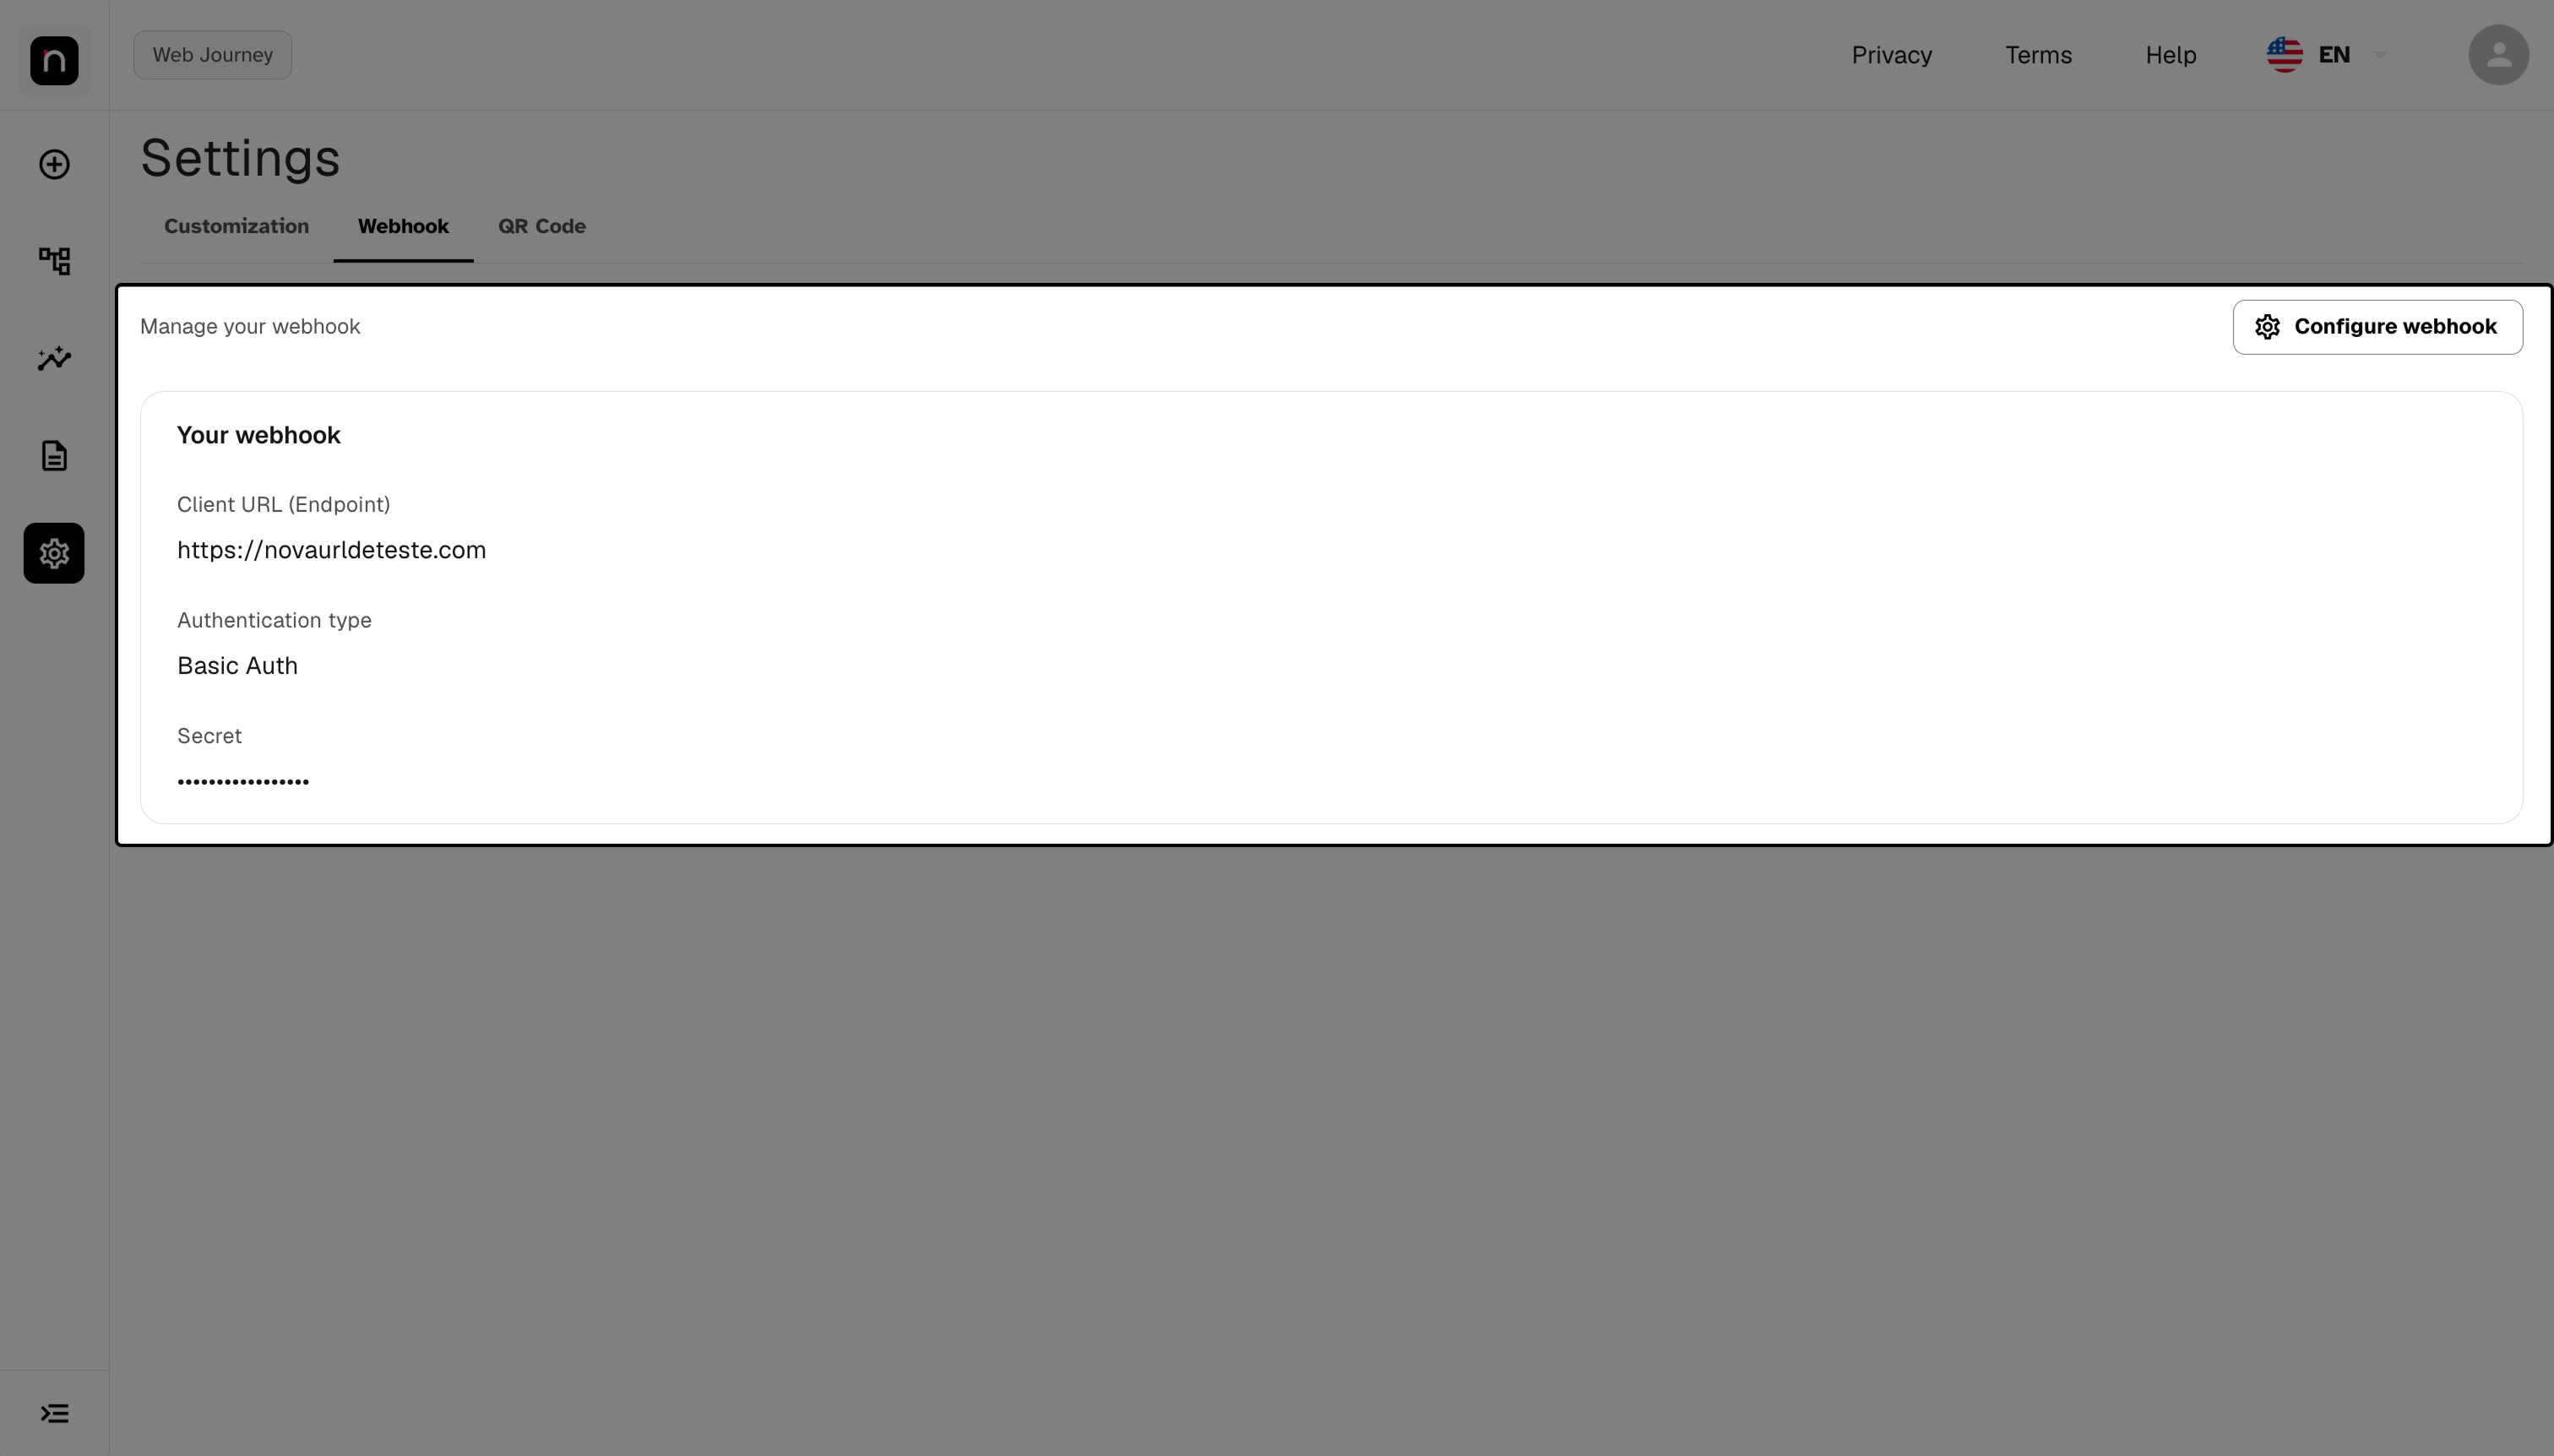
"Your webhook" card with endpoint, authentication type, and masked secret.
Step 2 — Enter your API's URL
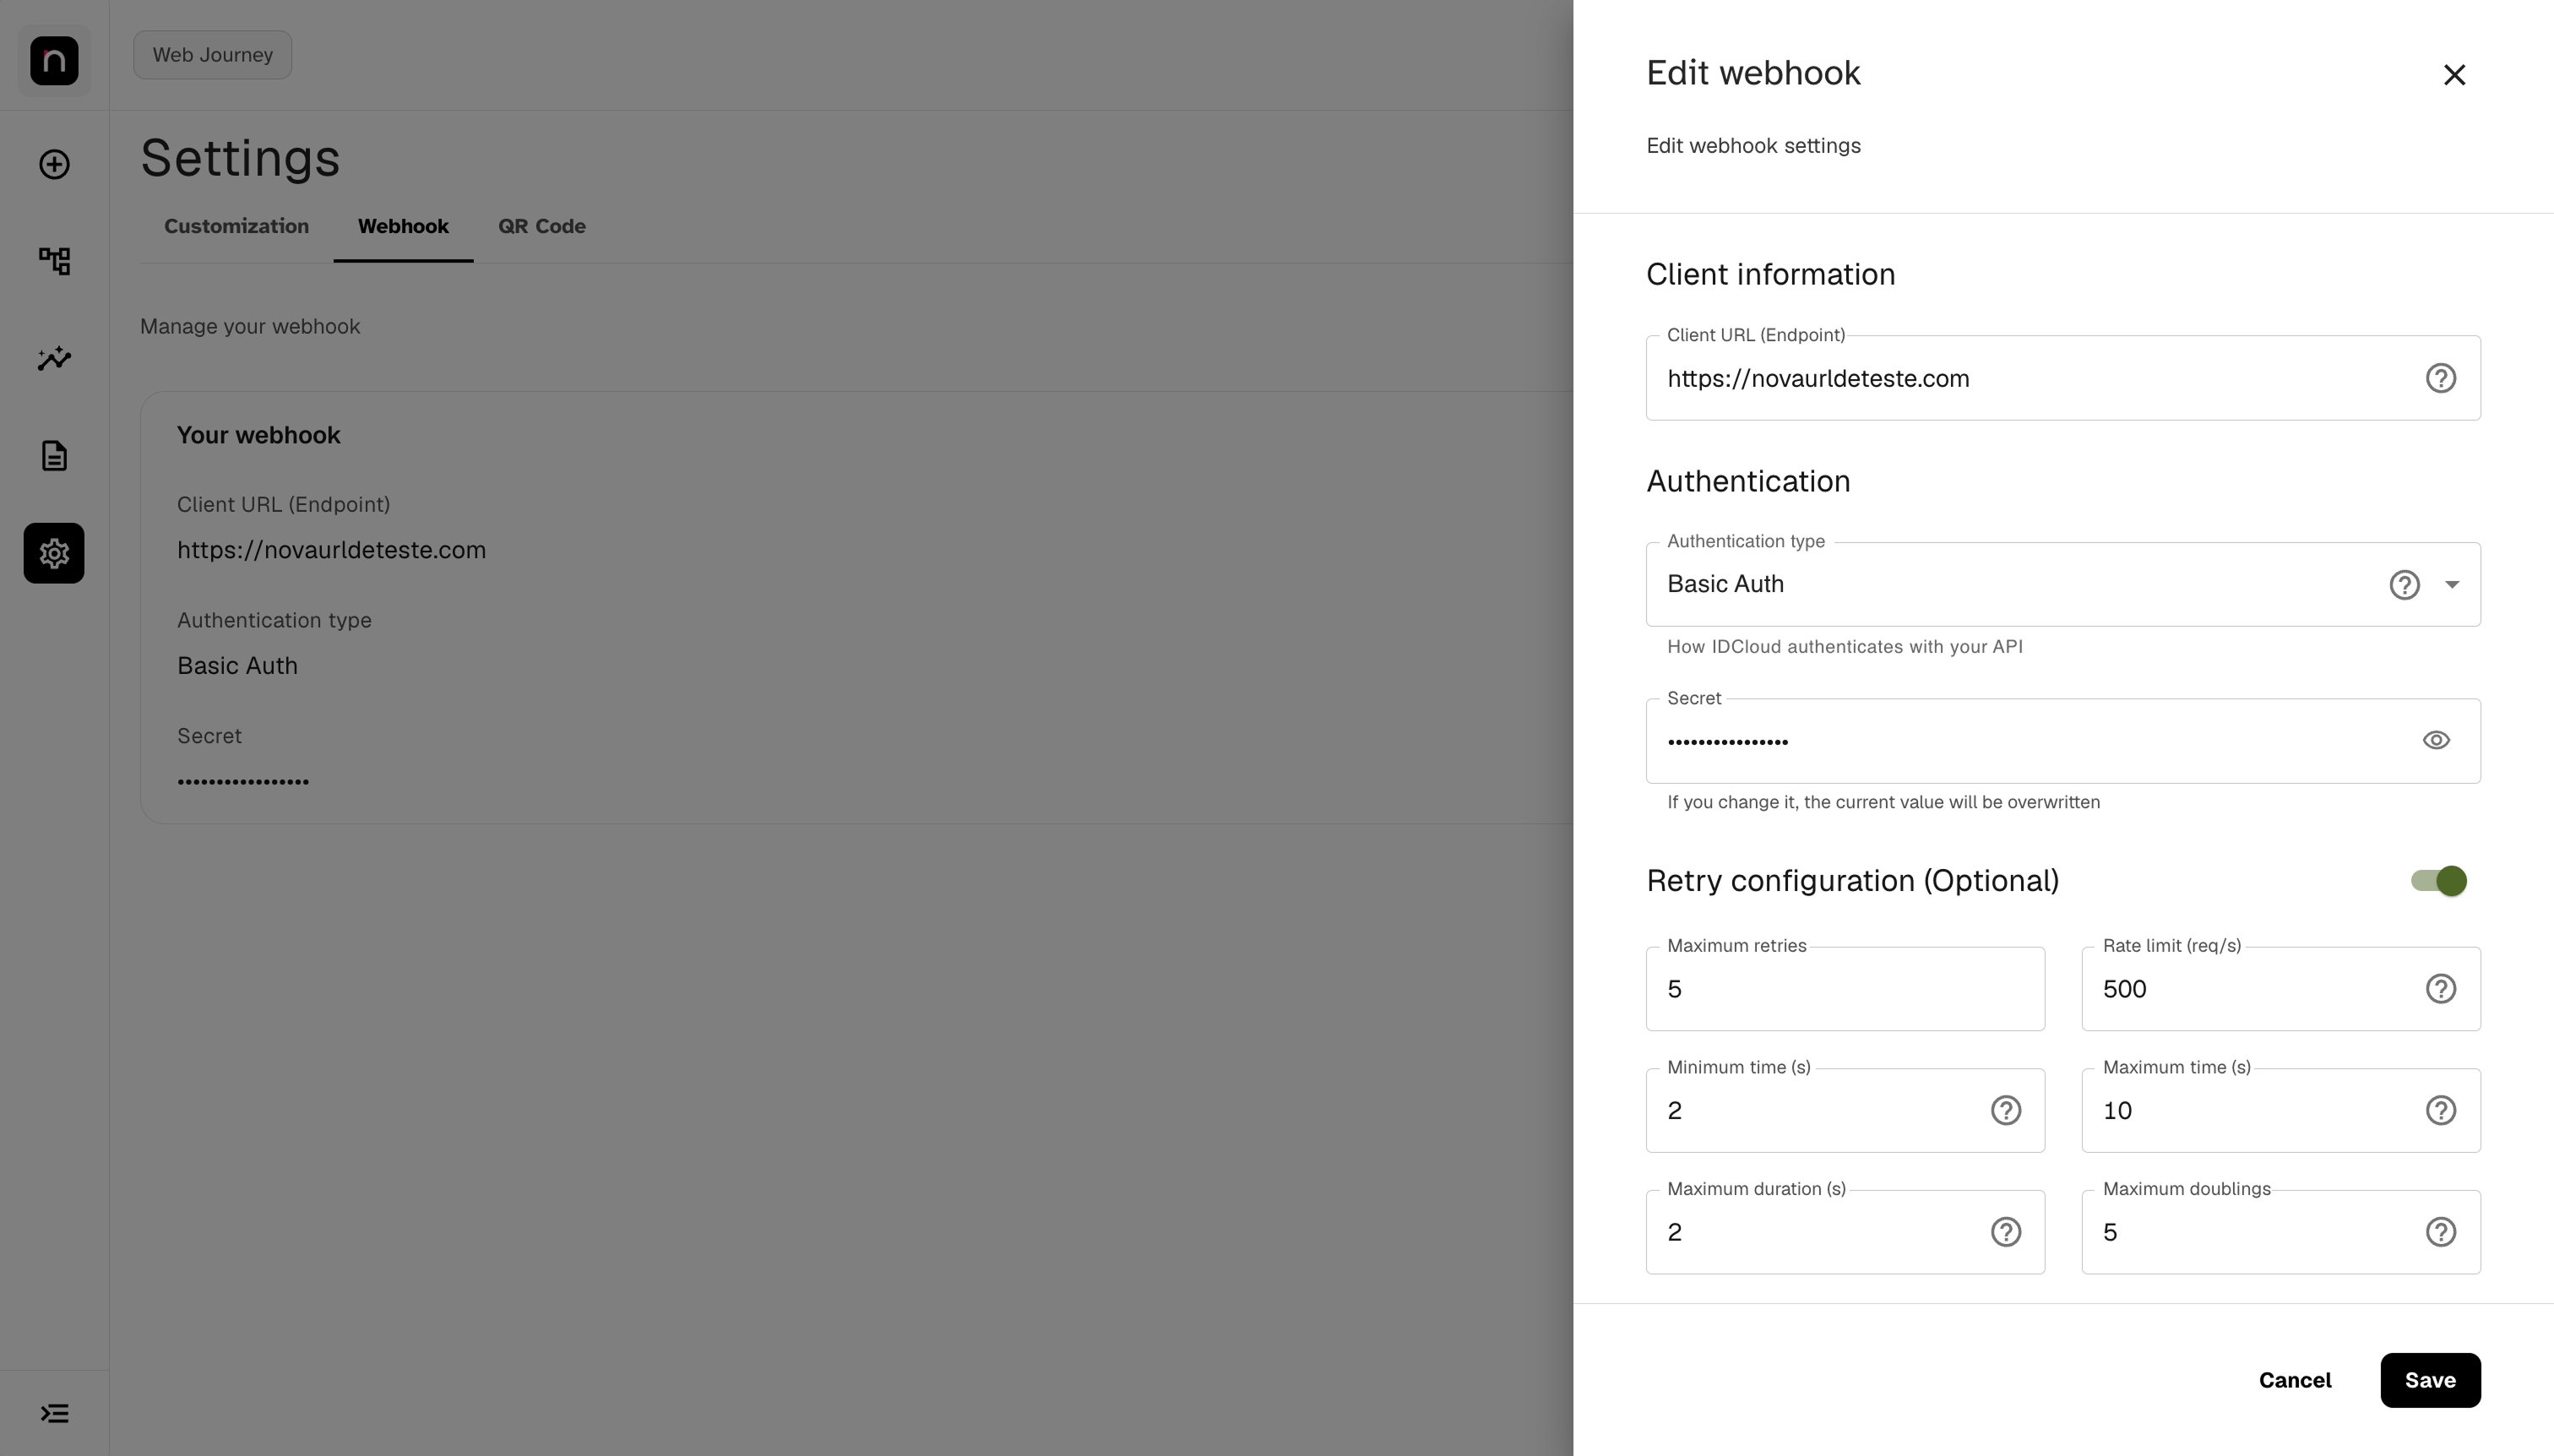
Click Create webhook (or Configure webhook, if one already exists) and fill in the Client URL (Endpoint) field, under "Client information".
This is the address IDCloud will send notifications to. It needs to be HTTPS.
Point it at an address that's already live. IDCloud starts calling this URL as soon as you save. If it doesn't exist yet, the first notifications will fail and burn through the retries before your team notices.
Endpoint field, with the helper text about the HTTPS requirement.
Step 3 — Choose how IDCloud authenticates against your API
Under "Authentication", select the Authentication type. There are five options, and each asks for different fields:
| Type | Fields shown | When to use |
|---|---|---|
| None | none | Your API doesn't require authentication. Only use this if it has some other protection — with no authentication, anyone who discovers the URL can send data to it |
| API Key | Secret | Your API validates a fixed key |
| Basic Auth | Secret | Your API uses username and password, HTTP Basic style |
| OAuth 2.0 | Auth URL, Client ID, Secret | Your API requires a token. IDCloud fetches the token from that URL and renews it on its own |
| mTLS | Client certificate, Private key, Server CA (optional) | Your API only accepts calls from clients that present a certificate (mutual TLS). IDCloud presents the certificate you provide on every notification |
For OAuth 2.0, the Auth URL is the address where IDCloud fetches the token — it's not the URL that receives the notifications. They're different addresses, and swapping them is the most common mistake on this screen.
The Secret is stored encrypted. When editing an existing webhook, the field shows up empty: filling it in overwrites the current secret, and leaving it blank keeps what's already there.
Confirm the method with whoever maintains your API before saving. The wrong authentication doesn't produce an error on screen — it produces a notification that fails silently afterward, and you only find out when a result doesn't arrive.
Authentication type field and the corresponding credential fields.
Setting up mTLS
With mTLS, IDCloud identifies itself to your API by presenting a client certificate (mutual TLS), instead of sending a key, a password, or a token. Your API has to be set up to ask for that certificate and to trust whoever issued it. Selecting mTLS shows three fields:
| Field | What to provide |
|---|---|
| Client certificate (PEM) | The certificate chain in PEM format, leaf first. Add the intermediate certificates after yours, so your API can link the certificate to an authority it trusts |
| Private key (PEM) | The key that pairs with the certificate, in PEM format and without a password. It's stored encrypted and never shown again |
| Server CA (PEM, optional) | Only if your API's own certificate is signed by a private certificate authority. Without it, IDCloud trusts public authorities |
You can pick a .pem file or paste the text. Each field takes up to 20,000 characters.
Some rules to know before choosing mTLS:
- The URL has to be HTTPS, and your API has to accept TLS 1.2 or newer.
- Once saved, the type is locked. The authentication type can't change to another one on this screen. To switch methods, contact Unico support.
- No other credential is sent. mTLS can't be combined with API Key, Basic Auth, or OAuth 2.0 on the same webhook.
- Redirects count as failures. IDCloud doesn't follow them, so point the URL at the final address.
Step 4 — Adjust the retries, if needed
The Retry configuration section is optional and starts off. Only turn it on if you need to change the default behavior.
Turning it on reveals six fields:
| Field | What it controls | Default |
|---|---|---|
| Maximum retries | How many times IDCloud tries again before giving up | — |
| Rate limit (req/s) | Maximum notifications per second. Lower it if your API has limited capacity | — |
| Minimum time (s) | Minimum interval between attempts | 2s |
| Maximum time (s) | Maximum interval between attempts | 10s |
| Maximum duration (s) | How long to wait per attempt before considering it a failure | 2s |
| Maximum doublings | Growth factor of the interval between attempts (backoff) | 5 |
The combined behavior: IDCloud tries, waits the minimum time, tries again, and keeps increasing the interval according to maximum doublings up to the maximum time — repeating until maximum retries. Each individual attempt gives up after the maximum duration.
Adjust the Rate limit before touching anything else. If your API falls over under load, the problem is throughput, not retries — and increasing retries in that scenario makes it worse, since it multiplies the calls. Lower the rate first.
Increasing Maximum retries doesn't replace a stable API. Retries cover momentary unavailability. If your API fails frequently, this setting only delays the moment you lose the notification.
The six retry fields, shown after turning on the toggle.
Step 5 — Save
Click Save. Cancel discards everything and keeps the previous configuration.
IDCloud validates the token URL before allowing you to save, when the method is OAuth 2.0. With mTLS, it validates the certificate and the key instead: both have to be in PEM format, the key can't have a password and has to match the certificate, and the certificate has to be within its validity period.
After saving, the Your webhook card shows the endpoint and authentication type. The secret shows up masked and can no longer be retrieved from the screen — if you lose the value, you'll need to set a new one.
Run a real test before considering it done. Start a journey in Staging and confirm the notification reached your API. The screen confirms the configuration was saved, not that your API received it.
FAQ
Can I register more than one webhook? No. It's one webhook per tenant and branch. If one already exists, it gets edited — there's no way to create a second one.
I configured it in Staging. Does it apply to Production too? No. The environments are independent: the Staging Portal configures the UAT webhook, and the Production one configures Production. You need to repeat the configuration in the Production Portal.
How do I see the secret I registered? You can't. It's encrypted on save and always shown masked. If you lost the value, register a new one via the Secret field — filling it in overwrites the previous one.
I edited the webhook but don't want to change the secret. What do I do? Leave the Secret field blank. The current value is kept.
How do I replace the mTLS certificate before it expires? Edit the webhook. The certificate and the private key show up masked. Provide the new certificate and the new private key — both are required, even if only one changed — and the Server CA again, if you use one. Then save. IDCloud starts using the new certificate within about 5 minutes, so keep the previous one valid a little longer than that before revoking it. If you leave the three fields untouched, the current certificate stays in use.
Can I switch from mTLS to another authentication type? Not on this screen: after saving, the type is locked. Contact Unico support to remove the webhook configuration, then create it again with the new method.
How do I delete a webhook? The screen doesn't offer deletion. To remove the configuration, contact Unico support. If the goal is just to stop receiving notifications or change the destination, edit the URL instead.
I saved and the notifications aren't arriving. Check, in this order: the URL is correct and is HTTPS; your API is live; the authentication method is what it expects; and the secret was typed correctly. With mTLS, also check that your API trusts whoever issued the certificate, that the certificate hasn't expired, and that the Server CA is filled in if your API's certificate comes from a private authority. Authentication failures don't show up as an error on this screen — they happen at delivery time.
What's the difference between "Maximum duration" and "Maximum time"? "Maximum time" is the longest interval between two attempts. "Maximum duration" is how long IDCloud waits per attempt before considering it a failure.
Do I need a webhook if I already poll for the result via the API? It's not required, but it saves your system from having to poll. If you already have a working polling routine, the webhook is an optimization, not a requirement.
Quick reference
IDCloud Portal
 └─ Settings (gear icon in the sidebar)
     └─ Webhook tab
         ├─ Client information ....... Client URL (Endpoint), HTTPS
         ├─ Authentication ............ None | API Key | Basic Auth | OAuth 2.0 | mTLS
         │                             OAuth 2.0: + Auth URL and Client ID
         │                             mTLS: + Client certificate, Private key, Server CA (optional)
         └─ Retries (optional) ....... Maximum retries
                                       Rate limit (req/s)
                                       Minimum time (2s) · Maximum time (10s)
                                       Maximum duration (2s) · Maximum doublings (5)

One webhook per tenant and branch · UAT and Production independent · Secret never shown · Cancel · Save